
Ever wonder how to make a Wooden Crate Storage Stool? Well, I'm sharing this quick and easy step-by-step project with y'all today!
Back in the day, I used to work at a restaurant, not sure if y'all know that about me or not. It was a fancy restaurant where bottles of wine came in wooden crates. The manager would always save the crates for me to upcycle into storage-style ottomans and I would sell them to my friends and co-workers. This was way before blogs or the internet, so I never took pictures or put together a tutorial.
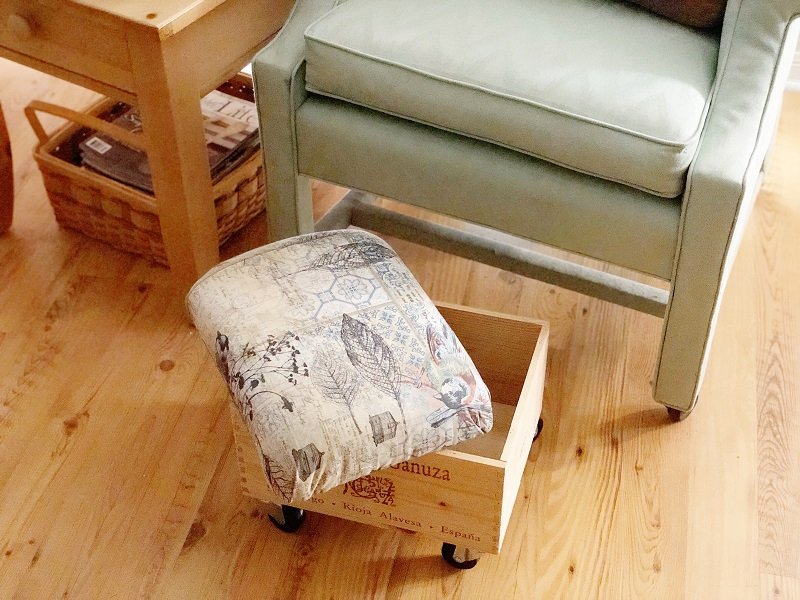
I recently found one last wine crate while Spring cleaning and am excited to be able to share my Wooden Crate Storage Stool step-by-step with y'all today. Fairfield World™ Cushion Foam and Poly-Fil® Cushion Wrap make this storage ottoman project functional, cute, and endlessly customizable.

How to Make a Storage Stool from a Wooden Crate

This post, How to Make a Wooden Crate Storage Stool, contains affiliate links. Using links to these sites means I will earn a percentage of the purchase at no extra cost to you.

Here's what you need to make a rolling Stool from a Crate:
- Wooden Wine Crate – similar crates can be found at flea markets and thrift stores
- Fairfield World™ Soft Support Cushion Foam – three inches thick
- Poly-Fil® Cushion Wrap by Fairfield World™
- Plywood (for the lid)
- Fabric – Eclectic Elements Wallflower by Tim Holtz
- Rolling Casters – Four
- Drill with Drill Bit and Screw Bit
- Circular Saw
- Electric Knife
- Measuring Tape or Metal Ruler
- Scissors – I love my Fiskars Mixed Media Shears
- Sanding Block
- Finish Screws – Twelve
- Staple Gun and Staples
- Spray Adhesive
Here's how to create an Upholstered Wooden Stool:
STEP ONE
Flip the crate upside down and mark screw placement for casters in each of the four corners with a permanent marker. I only used the three holes around the edges of the crate to secure the casters.

With Drill and bit, pre-drill screw holes. This will prevent the wood (especially old wood) from cracking and splitting.

Screw one caster into each of the crate's four corners with finish screws and a handheld drill.

STEP TWO
Measure the top of the crate on the plywood and mark it with a permanent marker.

Then cut the plywood to make the lid with a circular saw (or have a home improvement store cut it for you). Sand all edges smooth.

STEP THREE
Place Soft Support Cushion Foam on a work surface. Place the plywood lid on top of the Cushion Foam and trace around the lid with a permanent marker. Cushion Foam is dense, so it will retain its shape, but it also has soft support that is super comfortable.

I always cut Cushion Foam with an electric knife because it cuts like butter. This one has got to be considered “vintage” by now, I've had it since the 90's, but it still works great. BTW I only use this knife for DIY projects, not food.

In a well-ventilated area (or outside) cover the plywood lid with spray adhesive and attach Cushion Foam.

Press down on the Cushion Foam firmly to get a good bond to the plywood lid. TIP: Save the plastic wrap that the Cushion Foam is packaged in even if it is not perfect, roll the foam back up as tightly as possible, and use the plastic wrap to secure the foam for storage.

STEP FOUR
Iron the fabric, then spread it out on a work surface (I use my kitchen island for larger projects like this). Measure and cut the fabric four inches larger than the plywood lid and Cushion Foam on all four sides.

Spread Cushion Wrap on a work surface, and place the fabric on top, and cut the wrap to the same size.

STEP FIVE
Layout fabric facedown on a work surface. Place the Cushion Wrap on the fabric, then center the Cushion Foam and plywood lid on top of the wrap.

Create the upholstered cushion by gently pulling Cushion Wrap and fabric taut over one edge of the lid, and then place one staple in the center to secure. Repeat for the remaining three sides.

Continue smoothing, gently pulling, and stapling Cushion Wrap and fabric to the plywood lid. Work a few staples per side and continue to rotate until all four sides are secure. This will ensure that the fabric is upholstered evenly with no tight or loose sections.

To finish the corners, gently pull and staple the corner of the Cushion Wrap and fabric with the corner of the plywood. Staple excess by folding over and securing with additional staples.

Take your time and make the corners as smooth and even as possible.

When all edges are stapled, trim any excess Cushion Wrap and fabric with scissors.

To finish the Wooden Crate Storage Stool, fit the upholstered lid to the top of the box opening.
I hope that you will use my wooden crate storage stool ottoman as a jumping-off point to try an upholstered project soon. The Soft Support Cushion Foam and Poly-Fil ®Cushion Wrap from Fairfield World™ allows this to be a quick and easy DIY going together in just about two hours.
More Upholstered DIY Projects
My friend Laura who blogs at Me and My Inklings completed an Easy DIY Chair Makeover with a bright and boho vibe!

Beth over at the Kingston Home created a Bench from an Unused Bathtub which is just brilliant!


Step out of your comfort zone or get back to your roots and create something that you love for your home soon! Click through to my Easy DIY Spring Bunny Decor with DecoArt New Suede Finish Paints. These Sew Easy Outdoor Cushions are quick and easy to create, even for a beginner!

Sharing is Caring! If you LOVE it, Please PIN it!
Too busy to make this Wooden Crate Storage Stool Ottoman right now? Pin it for later! I'd love for you to pin this project to your favorite craft board on Pinterest and then it’ll be waiting for you when you’re ready.

I'd love to hear what you think about this project, or if you want to know more about Upholstery Crafts. If you've made your own Upcycled Furniture projects, I would love to see your creations! Share them on Instagram, and Facebook, or leave a comment/photo on the project pin on Pinterest! #CreativelyBeth


Thanks for stopping by!


This turned out so darn cute! i want to make these for my deck now!!!
Thanks, Laura! And it was super easy!
What a nifty ottoman Beth! I love anything on wheels too, the storage is a nice bonus too.
The wheels are my FAVORITE, Cara!!
What a great idea! The wheels would add a bit to the cost, but what a difference they make. I’m thinking this would be a wonderful place to store little toys for a child or a pet.
YES, Richella, the wheels were about $10 because I got the locking kind! The perfect place to hid the pet’s toys!