
Good Morning y'all! This week I am participating with a bunch of talented designer friends to celebrate that Adrianne Surian has a brand new book about Rock Painting for Beginners – super fun! Follow my tutorial below to create Paint Pour Rainbow Rocks in 15 minutes!
I have been mildly obsessed with paint pouring this Summer, so I wanted to try it on rocks to see what the results would be. Crafting is all about experimenting. Sometimes you have a winning project and sometimes you have a big fat craft FAIL, but it's all about the creative process.

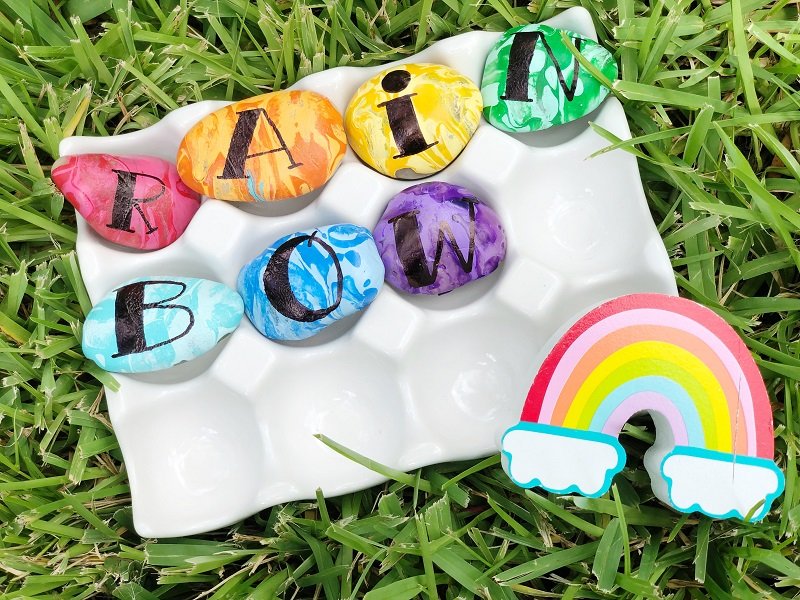
Pour Painting Rainbow Rocks
This post, Paint Pour Rainbow Rocks, may contain affiliate links. Using links to these sites means I may earn a percentage of the purchase at no extra cost to you.

Here's what you will need to create Paint Pour Rainbow Rocks:
- Americana Paints by DecoArt® – Country Red, Peony Pink, Orange Twist, Canyon Orange, Banana Cream, Saffron Yellow, Sweet Mint, Festive Green, Spa Blue, Aqua Sky, Baby Blue, Bright Blue, Lavender, Dioxazine Purple
- DecoArt® Pouring Medium
- Tombow MONOTWIN Permanent Marker
- River Rocks – mine were collected from the backyard
- Mixing Cups
- Craft Sticks
- Plastic Bags or Plastic Drop Cloth – I used kitchen trash can liners
- Baking Rack
- Paper Towels – LOTS of paper towels 🙂
Here's how to create Paint Pour Rainbow Rocks:
STEP ONE
Place plastic garbage bags or plastic drop cloth down on your work surface. Layout the baker's rack and place the rocks on top, leaving space in between. Set out 14 plastic mixing cups and then place an equal amount of DecoArt Pouring Medium in each cup.

STEP TWO
Add Americana Acrylic Paint to each cup. For this particular project, I used a primary hue and a pastel hue of each color in the rainbow – ROY G. BIV – red, orange, yellow, green, blue, indigo, and violet. Mix the paint into the Pouring Medium with a craft stick. I love my Americana Acrylics from DecoArt because they have one-coat coverage on most surfaces.

STEP THREE
Start out by pouring the lighter color over the rock, making sure to cover the entire surface of the rock, and then pour a smaller amount of the darker color. Continue layering the light and dark colors until you are satisfied with the effect.

Set the rocks aside to dry overnight.

STEP FOUR
Once dry, hand-letter each letter of the word RAINBOW, one letter on each rock with the Tombow MONOTWIN Permanent Marker. The MONO Twin is a versatile marker to craft with because it has a larger bullet tip and an extra fine tip, which makes it perfect for all types of applications.

15 Minute Rainbow Paint Pour Rocks
That's it! Quick and easy in just 15 minutes (not including drying time, of course!) A fun accent for any room, a colorful garden accent, or a secret message to leave somewhere in your neighborhood to be discovered later. Painted rocks bring joy to everyone, so get creating today! I hope you will use my Paint Pour Rainbow Rocks project as a jumping-off point to get creative and experiment with paint pouring or painted rocks this Summer!

Now it's time for the FUN STUFF! Click on the image below and let's hop around to the other designers participating in Craft Lightning Painted Rocks and see what they have created. The inspiration is AMAZING!

Create a Paint Pour American Flag which is perfect for patriotic home decor. I tried something new creating stars and stripes patterns within the pour, so let's get going and see how it turned out! DecoArt Ready to Pour paints and mediums make this an easy project to be successful at. The hardest part is waiting for the paint to dry!

Summer is here which means road trips, games, and when I was a kid – camping! I love carrying on these traditions with my family, especially if it means unplugging and getting back to nature. I have created a simple how-to DIY a Tic Tac Toe Game from a burlap sack so the kids can play where ever we may go. Get the kiddos involved in creating this project for some fun family time!

Sharing is Caring! If you LOVE it then Please PIN it!
Too busy to make these Rainbow Paint Pour Rocks right now? Pin it for later! I’d love for you to pin this project to your favorite craft board on Pinterest and then it’ll be waiting for you when you’re ready.

Thanks for stopping by!


Oooooh! Love it!
The efforts you have put in to create the posts are quite interesting. Looking forward to seeing you soon in a new post.
Children need to develop through a variety of arts that will encourage them to discover a variety of paintings.
What a fun way to try pouring medium. A perfect summer holiday craft.
Super easy, too Julie!