
I love felt and lace, so my Oh Christmas Tree Pillow is quick to create in just about an hour with no patterns and limited sewing. The Poly-Fil Premier Form from Fairfield World makes it easy! Vintage embellishments like lace and trims have been an obsession of mine for a while now, so I created this project to showcase these trims in the best possible way. The white lace and trims look like fancy snow on the felt Christmas trees, don't you think?

Welcome to the Fairfield World Pillow Party!
Our hostess Laura of Me and My Inklings is my craftiest friend AND she has invited 25 designers to create fabulous holiday pillows using the Poly-Fil Premier 20″ Form from Fairfield World.

This post, Oh Christmas Tree Project may contain affiliate links. Using links to these sites means I may earn a percentage of the purchase at no extra cost to you.
Here's what you will need to create a Christmas Pillow:
- Poly-Fil Premier 20″ Square Pillow Form from Fairfield World
- Ticking Fabric, Red – 1 yard
- Kunin™ Classic Felt 9″ by 12″ Craft Cuts – Olive, Kelly Green, Pirate Green (1 each)
- Kunin™ Classic Felt Yardage, Sandstone – 1/2 yard
- Beacon Adhesives Fabri-Tac
- Tonic Studios Nuvo Pure Sheen Sequins – Vanilla Delight
- Trims and Lace, Off-White – Assorted styles and sizes
- Metal Ruler – 36″
- Scissors (Fiskars are my favorite!)
- Straight Pins
- Sewing Machine (I love my Singer!)
- Thread, White
- Sewing Needle (for hand sewing)
- Pencil
Here's how to create a Pillow with Fairfield World:
STEP ONE
To begin the Christmas Tree Pillow, gather all supplies. Fold red ticking fabric with right sides together, facing in. Measure, mark, and cut two squares of fabric 24 inches by 24 inches. Measure in two inches from each edge and mark off a 20-inch by 20-inch square with a pencil. Make two pencil marks, leaving an 8-inch opening at the bottom center of the fabric to insert the form.

STEP TWO
Secure the fabric together along the pencil lines with straight pins, and then sew the fabric with a sewing machine, leaving the 8-inch opening at the bottom. Remove straight pins and cut loose threads. I like to use a .25″ seam allowance when sewing a large project like this.

Trim approximately one inch of excess from each edge of the fabric with scissors. TIP: I don't do a ton of sewing but I do have a pair of scissors dedicated to all my fabric and sewing projects so that I get clean fabric cuts. Make sure your fabric scissors are clean and sharpened often.

STEP THREE
Turn the fabric right side out through the 8-inch opening at the bottom of the project. Use a pencil or chopstick to get into the corners, so you have a sharp-looking finished project.

Insert Poly-Fil Premier 20″ Square Pillow Form into the cover. Now, this Premier Form is not your Momma's pillow form because it is soft, squishy, and extremely comfortable – not hard and stiff. The 20-inch square is a great size for a decorative pillow but is also perfect for snuggling and napping which are important features!

STEP FOUR
Fold the raw edges of the fabric in, following the sewn seam. Secure the opening at the bottom with straight pins inserted horizontally.

Hand stitch the opening closed with tiny whip stitches using a needle and thread that matches the color of your project.

STEP FIVE
Measure and cut a 14-inch by 14-inch square of Kunin™ Classic Felt Sandstone. Attach decorative trim along the edges with Beacon Adhesives Fabri-Tac. Set aside to dry.

STEP SIX
Cut out simple Christmas tree shapes from Kunin™ Classic Felt Olive, Kelly, and Pirate Green. One large, using the entire 12-inch length of the craft cuts felt sheet, and two slightly smaller with longer trunks. Create a pattern from scrap paper if that is your preference.

STEP SEVEN
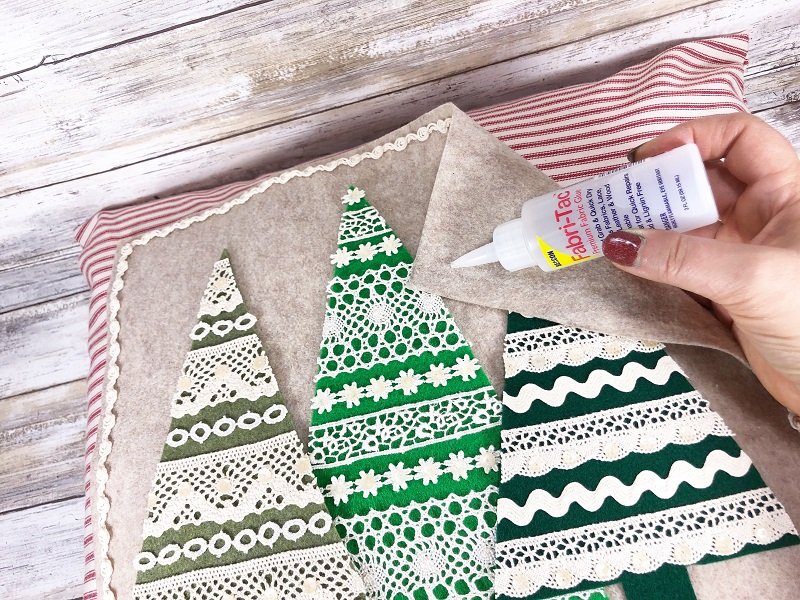
Apply assorted decorative trim and lace to each felt Christmas tree shape with Fabri-Tac. Embellish lace and trim with Tonic Studios Nuvo Pure Sheen Sequins. Set aside to dry.

Flip each felt Christmas tree over and trim off excess trim and lace with scissors.

STEP EIGHT
Attach each Christmas tree to the felt square, using Fabri-Tac. Starting in the center with the largest tree, and layering the smaller right and left trees on top.

Finally, attach the Christmas tree embellishment to the pillow with Fabri-Tac.
Oh, Christmas Tree Pillow with Fairfield World
I hope that you have enjoyed my Oh Christmas Tree project with Fairfield World and that you will use my design as a jumping-off point to create a fun, quick, and easy pillow to decorate your home this holiday season! Show off those vintage laces and trims by making them the star of this project.

Now, here is the FUN part!

Start HERE at Laura's blog to get all of the details!
Hop around to view all 25 of the fabulous projects that my talented designer friends created
- Gnome Pillow by Laura at Laura Kelly Designs
- Pom Pom Snowflake Pillow by Emily at The Benson Street
- 3 Snowmen and a Bunny Pillow by Cindy DeRosier
- Reindeer Prance Pillow by Lindsey at Artsy Fartsy Mama
- Tree in a Truck Pillow by Katie from The Crafty Blogstalker
- Snowflake on Buffalo Plaid by Cheryl and Maybe That's What Che Said
- Snowman Pillow by Janet at Try It Like It
- Oh Joy Pillow with Pom Poms by Ginger at GingerSnaps Crafts
- Merry Christmas by Ann Makes
- 25th of December Pillow by Lindsay at See Lindsay
- Joyful Pillow with Pom Poms by Natalie at DoodleCraft Blog
- Plaid Christmas Tree Pillow by Erica at Five Little Monsters
- Harry Potter Christmas Pillows by Julie at The Quiet Grove
- Felt Tree in Truck Pillow by Debra at Quartermain Designs
- Joyeux Noel Pillow by Monica at Sookee Designs
- Oh Come Let Us Adore Him Pillow by Amy at Amy Latta Designs
- Joy on Snowflakes Pillow by Diana at Miss USG Moments
- Polar Bear Pillow by Kimberly at Crafting Cheerfully
- Let It Snow Pillow by Katie at A Sweet Berry Designs
- All Hearts Come Home For Christmas Pillow by Suzie Bentz Designs
- Ornaments Pillow by Morena's Corner
- Meet Me Under the Mistletoe by Laura of Laura's Crafty Life
- Fresh Farm Christmas Trees by Laura at Laura's Crafty Life
I would like to send out a big THANK YOU to Fairfield World, Tonic Studios, and Beacon Adhesives for sponsoring the Fairfield World Pillow Party! For more Fairfield World inspiration, check out my Ugly Christmas Sweater Gnomes stuffed with Poly-Fil.

Sharing is Caring!
Too busy to make this Oh, Christmas Tree Lace and Felt Pillow right now? Pin it for later! I'd love for you to pin this project to your favorite craft board on Pinterest and then it’ll be waiting for you when you’re ready.

Thanks for stopping by!


Beautiful! Yours is one of my favorites.
Thank you, Cindy! My first idea was a bust, so this idea just happened organically!
I love how ornate the lace makes the trees look with minimal effort! Winning!
Thank you, Emily!
So beautiful with all that lace. Great job! TFS.
Thank you, Ann!
Cute! Cute! Cute! You can never go wrong with Christmas trees and lace!
Thanks Susie!
Awh! This is beautiful, I love those lacy trees
Thanks a bunch, Julie!