
Truth be told I am a total hoarder. My little not so silent voice is always saying “I can use that for a craft project” to the point where I had bins and bins of surfaces that I simply had to keep. One of my favorite thing to keep hoard is Mason Jars because they are just so versatile and inexpensive. Recently I discovered that by combining some of my favorite Tombow products I could create a tinted glaze to add to plastic and glass to change the color. My project How to DIY Mason Jar Witch Lantern will step you through this process. Just scroll down to see how easy it is! I am so excited to be sharing today as part of the Creative Crafts Halloween Edition, so stop back by each day this week to see all of the creative inspiration!

DIY Mason Jar Witch a Halloween DIY

This week I am co-hosting Team Creative Crafts HALLOWEEN Crafts Edition with my crafty friends Laura from Laura Kelly Designs, and Lindsay from Artsy-Fartsy Mama. We are featuring ALL the fabulously colorful and cute craft projects from some of the most talented designers we know. Check out my tutorial, then scroll down to see all the creativity, AND stop back on Saturday to see what everyone has created!

This post, How to DIY Mason Jar Witch Lantern, contains affiliate links. Using links to these sites means I will earn a percentage of the purchase at no extra cost to you.

Here's what you need to make a Colorful Witch Lantern:
- Dual Brush Pens from Tombow – N15, 173 and 195
- MONO Aqua Liquid Glue from Tombow
- Tombow Xtreme Permanent Adhesive
- MONO J Drawing Pencil from Tombow – 2H grade
- Tombow Blending Palette and Spray Mister
- Tombow MONOTWIN Permanent Marker
- Mason Jar – quart size, wide mouth
- Hug Snug Seam Binding Ribbon (8 yards)
- Black Cardstock
- Paint Brush – old
- Scissors – I love my Fiskars!
- Craft Knife
- Ruler
- Rhinestones (lime green)
- Fibers (orange)
Here's how to create a Mason Jar Witch:
STEP ONE
Randomly scribble Dual Brush Pens 173 and 195 on the Tombow Blending Palette, then add a quarter-size dollop of MONO Aqua Liquid Glue, mix and apply to the outside of the mason jar with an old paintbrush. Set aside to dry. Apply additional coats, if necessary. You can also use a gallon-size plastic zipper bag instead of the Blending Palette.

STEP TWO
Measure out 8 yards of seam binding. Scribble Dual Brush Pen N15 on the Blending Palette, spray with the Spray Mister then scrunch the Hug Snug Seam Binding into the color. Repeat as needed until you obtain the correct color. Use a plastic glove or plastic bag to prevent transferring the ink color onto your hands. Scrunch and set aside to dry on a paper towel. If you can't find the Hug Snug Brand just make sure that you use 100% Rayon Seam Binding Ribbon like this one from Boye.

STEP THREE
Once dry, measure and cut one length of the seam binding ribbon to 24″ long and then cut thirty lengths to 7″ long. I love how the Dual Brush Pen color dries in light and dark sections on the woven edge rayon seam binding.

STEP FOUR
Measure around the neck of the mason jar and subtract 2-inches for the face. My jar neck was 9-inches, so I attached the short lengths of seam binding to a 7-inch length of the seam binding with MONO Aqua Liquid Glue. Allow the glue to dry and attach the second row of short lengths over top of the first row.

STEP FIVE
Once dry, tie the witch’s hair around the neck of the mason jar, with the knot to the side.

STEP SIX
Measure and cut a 6-inch circle of black cardstock with the MONO J Drawing Pencil. Plot out the center, trace the jar lid rim, and cut out with a craft knife on a self-healing mat. Measure and cut a 6-inch by 12-inch triangle from black cardstock that will become the witch’s hat.

STEP SEVEN
Apply Tombow Xtreme Permanent Adhesive to the edge of the triangle, remember to roll, and then swipe the tip to the side for a clean application. Roll cardstock loosely, then fit it to the neck of the mason jar and attach permanently. Place the cone on the jar as the hat and then pace the brim of the hat.

STEP EIGHT
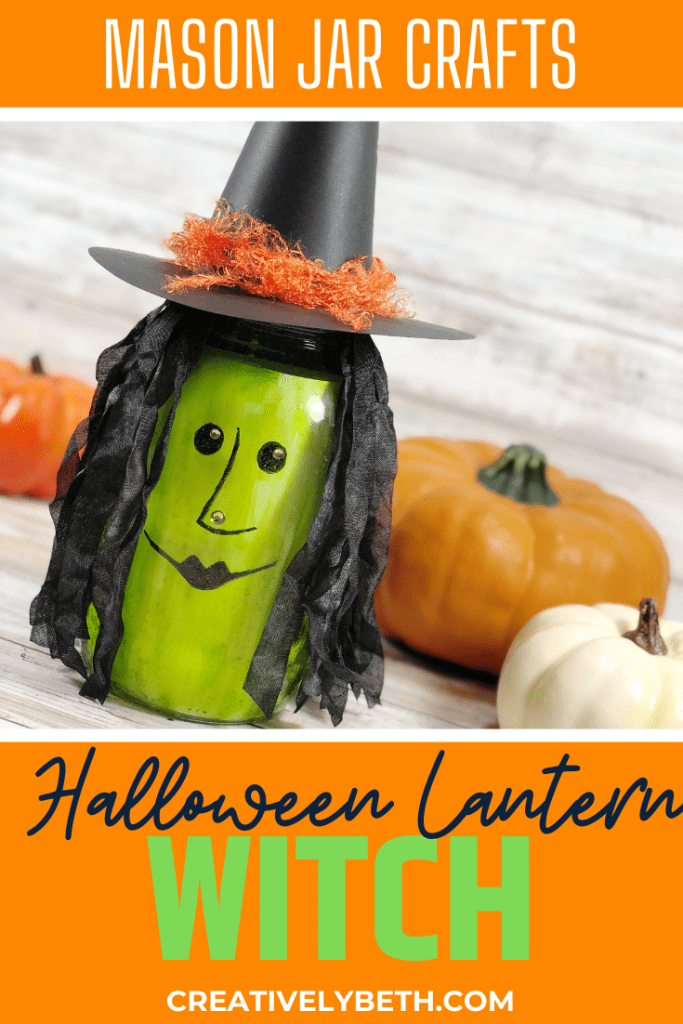
Draw features on to the mason jar front with MONOTWIN Permanent Marker, which has a larger bullet tip and a smaller fine tip, so it's like two pens in one! Attach small green rhinestones to each eye as a highlight and a medium one as a wart on the witch’s nose. Embellish hat with orange fibers.

Quick and Easy DIY Mason Jar Witch
I hope you will use my DIY Mason Jar Witch Lantern project as a jumping-off point to showcase YOUR Halloween creativity. Add a battery operated tea light to create a Lantern or fill with candy and give as a gift. Try this tinted glue technique on ALL of the glass and plastic surfaces to create unique pieces of home decor to match your space perfectly.

Now it’s time for some INSPIRATION!
Below are more spooky, cute, and kooky projects created by some of my craftiest designer friends. We are participating in the Creative Crafts – HALLOWEEN Edition. Scroll down to see all the goodness. Stop back by each day this week for all the super cool projects!
Laura with Me and My Inklings is my second co-host and has created the yummiest Pumpkin Sugar Cookies with Royal Icing. I just love sugar cookies, how about you? OMG THOSE FACES!

My sweet friend Debra from Debra Quartermain Designs created No-Sew Pumpkins from Shirt Sleeves for her Grandlittle girls. I just love the unexpected and fun color palette and those darling tags!

Michelle blogs over at Michelle's Party Plan-it and is sharing a fun Dollar Tree upcycle DIY Halloween Gnome. Check out her video to see how she made this fabulous transformation!

Cindy with My Creative Life has made a Witch's Cauldron from a Paper Plate that would be the perfect activity to create with the kiddos on a rainy afternoon!

Laura with Laura's Crafty Life is sharing a colorful Halloween Deco Mesh Wreath with supplies from the Dollar Tree. I just love a cute and cost-effective holiday project!

Jenny from Jenny's Crayon Box created an adorable Pumpkin Quote Board to add to her Halloween home decor. Super cute plus quick and easy!

Creative Crafts Halloween – Day Three!
Remember, today is Day Three! Here is the link to Creative Crafts Halloween Edition Day One and Creative Crafts Halloween Edition Day Two and stop back by each day this week for more creativity. I promise you won’t be disappointed, but rather inspired! Create my project DIY Mason Jar Witch Lantern with the kiddos this Halloween season!

Halloween is my FAVORITE time of the year, so I have a ton of fun ideas and projects. Check out my FREE Hand-Drawn Halloween Banners to Print and Color with the kiddos!

Thanks for stopping by!


Totally adorable!
Michelle
https://mybijoulifeonline.com
THANKS A BUNCH, Michelle! 🙂
Cute craft, mason jars are fun.
Cindy
Yes, Cindy, I LOVE mason jar crafts!!
That is so sweet, what a great jar upcycle. I love the creative use of your pens.
Thank you so much, Julie! I love being creative 🙂
That’s adorable, makes me wish we had little people around for Hallowe’en.
I craft even though the kiddos are all grown up!!
Wonderful Mason Jar Witch! Thank you for sharing at Party In Your PJ’s.
Thanks, Ann! She is so much fun to make!
I can’t throw away a mason jar either so I love projects that create something out of them. This is adorable. Glad you shared it this week. #HomeMattersParty
Thanks for hosting a great party!!
So cute! What a great upcycle!
Thanks a bunch, Lisa!
Super cute witch. I am happy to feature your darling mason jar witch at love Your Creativity.
Thank you Linda! I loved making her!
Your witch mason jar is adorable! I’ll be featuring it this week at the #HomeMattersParty. Thanks for sharing! Pinned. Allyson @ Southern Sunflowers
Thank you, Allyson! She was SUPER FUN to make!!