

Welcome to Day 2 of the 5th Annual Handmade Holidays Blog Hop!
I am excited to be participating with this awesome group of creative friends that will inspire you with great gift ideas for the Holiday season!
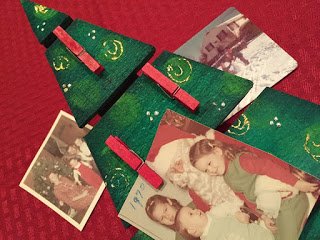
As my Mom and Dad get older, the gifts that mean the most to them are keepsake gifts, so I have decorated this Pallet Tree with cherished photos of Christmases Past. It was a fun walk down memory lane and I know my parents, siblings, nieces and nephews will get a kick out of the “vintage” photos. Good times!

Now on to my project!
1.) Stain the Pallet Tree by misting with water and applying Crafter's Ink in Limelight, Evergreen and Deep Woods over entire surface, sides and back. Start with darkest color and end with lightest color. Apply a second coat and re-ink pads, if necessary. Let dry. Stain trunk with Crafter's Ink in Bark.


2.) Mist wood again with water and allow the inks to bleed and seep into all of the nooks and crannies of the rough wood surface. Blend in Limelight Crafter's Ink Refill on Colorbox Stylus with circle tip and stamp on surface of Pallet Tree. Fill in edges using Stylus loaded with Evergreen and Deep Woods Crafter's Ink Refills.

3.) Color mini clothes pins with Tombow Dual Brush Pen in Crimson. I love the Dual Brush Pens for quick projects, as they cover a variety of surfaces well and dry instantly.

4.) Attach clothes pins to Pallet Tree with Tombow MONO Multi Liquid Glue, let dry.

5.) Decorate your Pallet Tree with lines dots and squiggles of Tombow MONO Multi Liquid Glue. Draw on, let dry to clear, then apply Colorbox Designer Foils. The MONO Multi Liquid glue does not dry completely, but rather remains tacky which makes a perfect base for Designer Foils to adhere to.


6.) Copy, trim and attach vintage Christmas photos to clothes pins.
Display your Pallet Tree and ENJOY the smiles that all of these wonderful memories bring to you and your family!
Side note: I have to say that I was not at all sure how this technique would turn out, but I am so incredibly pleased with the results! Misting the inks with water blended them together like butter and gave the piece such depth. I LOVE IT and will definitely use this technique again! Just make sure you leave plenty of drying time (at least over night).
Products and Materials Used:
Clearsnap® ColorBox Crafter's® by Ann Butler Inks and Refills – Limelight, Evergreen, Deep Woods and Bark
Clearsnap® ColorBox Designer Foils – Goldmine, Silver Fog and Lucky Penny
Clearsnap® ColorBox Stylus and Tips – Circle Tip and Oval Tip
Color Copies of Christmas Photos, Water Mister, Scissors, Pencil, Ruler, Paper Trimmer, Mini Clothes Pins (8).
Now on to the really FUN STUFF – PRIZES!! Tombow USA is giving away a great package of prizes, featuring Dual Brush Pens and Adhesives! Enter through the Rafflecopter widget below from November 6th until November 15th!

document.write(”);
And EVEN MORE PRIZES!! The Handmade Holidays Blog Hop is having a giveaway of over $600 (Yes, I said $600, just look at the photo below!) in craft supplies to help you make this holiday handmade. Enter to win using the Rafflecopter widget below:
A BIG THANK YOU to all of our sponsors!

Thanks for stopping by! -Beth


What a great idea Beth! My parents have moved to a smaller apartment and each year putting up a tree is harder for them but they want to do it. This would be a possible solution.
This looks like so much fun to make! Adding to my to do list, thanks for sharing and the chance to win a great prize package!
Janelle R
wonderful idea Beth and so festive for the holidays.
Darling project, love the bright colors with little bits of gold
very fun idea! and a great way to share Christmas cards and pics through the holiday. Thanks for sharing
I just picked up a dozen packages of mini clothespins at that after Halloween sales (75% off)
Thank you for a way I can reuse them right away. I will decorate something for the nursing home.
It is fun to go through the old photos.
What a sweet project. Thank you for sharing.
I just love this project and would love to make it for Christmas this year.
I found my gift project! I know my family will love these! I'll even attach a copy of my parents first Christmas together. Thank you for the inspiration!! Patricia B
Thanks for the idea and for the giveaway!
A great idea for displaying photos, or Christmas cards. Thanks for this and the giveaway!
A good idea to remember the happy moments
Very cute idea! TFS!!
Very Cute!
Your tree photo holder is wonderful! I love the way you painted the wood! Great, quick idea! Thanks for sharing with us!
Your photo tree is really a great project. Thank you for sharing.
love this idea, would be great for showing off your received Christmas cards too!
What a cute idea!! Love it!
Great Christmas idea! and this is a wonderful giveaway, thank you for being part of the raffle. pick me, pick me! 🙂
Your project touches my heart Beth – it is exactly the same for our family, especially as we have lost three loved ones earlier this year. The older we get, the more precious family times together and memories of "the good old days" become!!!
LOVE your PRETTY pallet tree and the SMILES I know it will bring 🙂
THANK YOU for sharing your CREATIVE INSPIRATION, it's great to have MORE ways to use my go-to-glue AND to have a project to add to my to-do list that will be a pleasure to make and share!!!
PS – TracyM #6773 is me, Tracy Moloney 🙂
I am definitely making one of these for each of my sons to have pictures of loved ones who are no longer with us!! I am also going to make one for my friend and her family for their loved ones who have left us. TFS!
What a wonderful idea for holiday photos!
What a great idea! Love that you used photos. And that other things could be used too like postcards or other memorabilia. Thanks for sharing.
Katie B.
Very cute way to show off Christmas past photos. Thanks
Super-fun project and wonderful effects with the ink blending and the foils. I know your family will enjoy this.
<3 J
jwoolbright at gmail dot com
HerPeacefulGarden.blogspot.com
Great idea for loved ones….thanks for sharing!!
This looks like a fun, easy project that can be finished before Christmas! Thanks for the idea.
Wow! I never tried "painting" wood with my ink! Glad to know it can be done!
Carmen L
Very clever! I'm going to make glass blocks and stencil this year!
Very clever! I'm going to make glass blocks and stencil this year!
I am disabled and I am not able to put up a huge tree so I am thinking of making this for our tree this year! Thank you for the inspiration! Love it!