
Make a DIY Glitter Snowman Jar for the holidays and all Winter long. Creating all the things that sparkle is quick and easy with Glitter-It from Beacon Adhesives. Transform glass and plastic ornaments, vases, and jars into glittering works of art with this amazing adhesive. Now you can build a snowman that won't melt all season long! Quick and easy to complete in just about 15 minutes, not including drying time.

Easy DIY Glitter-It Snowman Jar

This post, DIY Snowman Jar, contains affiliate links. Using links to these sites means I will earn a percentage of the purchase at no extra cost to you. This post is sponsored by Beacon Adhesives, but the ideas and projects are my own design.

Here's what you need to make a Snowman Jar:
- Glitter-It by Beacon Adhesives
- Round Jar with Metal Lid – Dollar Tree
- Glitter, Chunky White
- Wooden Spool – Upcycled Vintage
- Americana by DecoArt Acrylic Paint – Lamp Black, Jack-O-Lantern Orange
- Paintbrush
- Glue Gun and Glue Sticks – Dollar Tree
- Decorative Ribbon – Dollar Tree
- Scissors – I love my Fiskars!
Here's how to create a Sparkling Snowman:
STEP ONE
To begin the DIY Glitter Snowman Jar, gather all supplies. I found this cute and round glass jar with a metal screw-on lid at Dollar Tree. thoroughly wash and dry the glass jar and the metal lid. Once dry, pour a small amount of vinegar into the glass container, swirl it around and pour out the excess in the sink. Let dry completely.

STEP TWO
Protect your work surface with paper towels. There is a spout on the Glitter-It bottle, but I prefer to unscrew the lid and pour from the bottle directly. For this size jar, I poured in about half of the bottle of Glitter-It, and then replace the cap on the bottle.

STEP THREE
Screw the metal lid back onto the glass jar. Swirl the liquid adhesive Glitter-It around the entire inside surface of the glass jar. I swirled several times and made sure that all surfaces were covered. Pour the remaining Glitter-It carefully back into the bottle.


STEP FOUR
Immediately unscrew the metal lid and pour a generous amount of chunky white glitter into the glass jar coated with Glitter-It. Replace the metal lid and shake up the glitter inside the jar until the entire inside surface is covered. I poured the small amount of excess sparkle flakes into the trash.


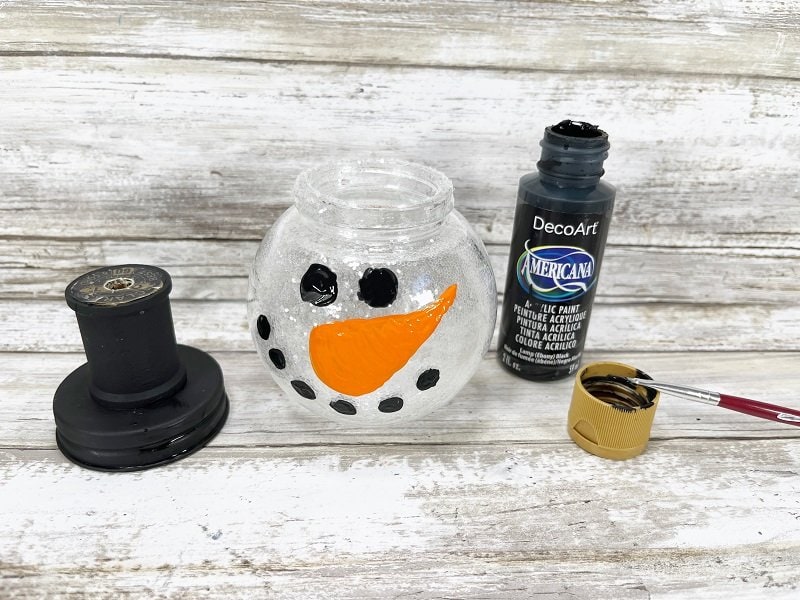
STEP FIVE
Attach a vintage wooden spool on the top of the metal lid with a glue gun and glue sticks. This will become the snowman's top hat. Paint a Jack-O-Lantern Orange carrot nose on the front of the glittered jar in the center. Basecoat the wooden spool and metal lid with Lamp Black acrylic paint, and then add two coal eyes and a coal mouth. I love the vintage label on the top of the spool, so I did not paint over it, and I think it adds to his charm. Wrap decorative ribbon around the base of the wooden spool and secure it in the back with a glue gun and glue sticks.

DIY Glitter Snowman Jar with Beacon Adhesives Glitter-It
Glitter-It from Beacon Adhesives is an easy way to add a coat of sparkle to the inside of any glass or plastic vessel. Y'all know that I am an impatient crafter, so I love that this was a quick craft going together in just about 15 minutes, not including drying time. I bought three of these jars, so now I am thinking up creative ideas for the other two! Add a battery-operated tea light inside the jar to give your home decor a warm cozy glow all Winter long.


When Laura from Me and My INKlings found this jar at the craft store, she immediately wanted to take it home and turn it into a glittery Santa Claus. With Glitter-It! from Beacon, it is so easy and fun to make the inside of glass vessels turn from boring see-through glass to dazzling sparkles of color with glitter. I am pretty sure he just might be the most adorable Gumball Machine Santa in the whole wide world.

The weather is getting colder, which means it's finally hot cocoa season! There are so many creative cocoa creations, which makes the freezing winter weather a little more bearable. As an ode to her favorite winter beverage, Lindsay from Artsy Fartsy Mama is putting together a small cocoa station in her kitchen, complete with this *sparkling* new piece of Hot Coca Glass Block Decor. Even better – she is sharing the FREE cut file in this tutorial so that you can make this project for your own home!

Sharing is Caring!
Too busy to make this DIY Glitter Snowman Jar right now? Pin it for later! I'd love for you to pin this project to your favorite craft board on Pinterest and then it’ll be waiting for you when you’re ready.


Thanks for stopping by!


I’m glad I found your blog.
YAY, Rebecca! I am glad that you found my blog too! Have a FABULOUS WEEK!