
Get a better night’s sleep? YES! I don’t know about you, but my sleep patterns are all over the place recently. And getting a bad night’s sleep affects everyone. Especially if you are working from home with your partner, schooling the kiddos, and doing ALL THE THINGS! You need every precious minute of sleep you can get. A simple DIY sleep mask created with Poly-Fil® Project Fleece by Fairfield World™ will help keep the light out and hopefully save a little of your sanity. This quick and easy sleep mask goes together in 30 minutes with household items.

Simple DIY Sleep Mask Tutorial

This post, Create a Simple DIY Sleep Mask with Household Items, may contain affiliate links. Using links to these sites means I may earn a percentage of the purchase at no extra cost to you.
DIY Sleep Mask – Supplies:
- LINING – Poly-Fil® Project Fleece Batting by Fairfield World™
- FABRIC – Cotton fabric for the front and back of the sleep mask. Choose a soft fabric that won’t irritate your skin. I had this fun lime green 100% cotton fat quarter in my fabric stash.
- TIES – Fold-over elastic would be my first choice for this project, but I did not have any in my stash. T-shirt Yarn makes a great substitute. Check out my quick and easy tutorial How to Make Yarn from Recycled T-Shirts. It only takes 10 minutes!
- SEWING MACHINE – I love my Heavy-Duty Singer
- EMBELLISHMENT – Kunin Classic Felt™ 9” x 12” Craft Cuts in Baby Pink
- ADHESIVE – Fabri-Tac from Beacon Adhesives
- OTHER SUPPLIES – Pencil, Straight Pins, Scissors (I love my Fiskars!), Repositionable Adhesive Runner, Thread, Iron and Ironing Board
- PATTERN – Click on the link below ⇓ to download the Simple DIY Sleep Mask Patterns.
Simple Sleep Mask – Instructions:
Included below are the step-by-step instructions and photos to complete my tutorial
STEP 1 – CUTTING
Download, print, and cut out the pattern file BELOW. Trace and cut the mask pattern onto the backside of two pieces of fabric and one piece of batting.
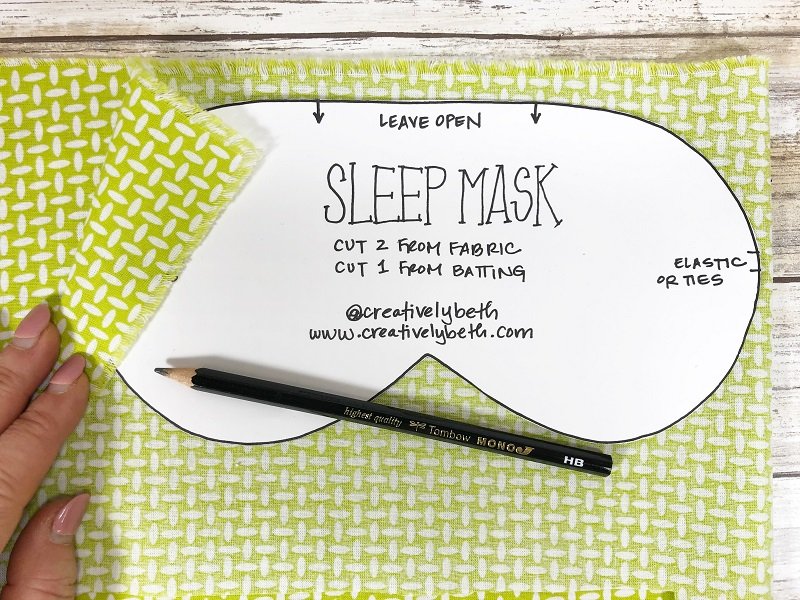
2 Fabric (one for the front and one for the back)

1 Batting (for the lining)

STEP 2 – BASTE TIES
On the right side of the front mask fabric, pin the DIY T-Shirt Yarn ties on the sides in the position marked on the pattern. Stitch back and forth several times with the sewing machine to secure. I do this prior to stitching the mask for added security. Check out this complete tutorial to learn how to make T-Shirt Yarn.

STEP 3 – ADD BATTING
Layer the mask pieces as follows: mask front with ties attached (right side of the fabric facing up) and mask back (right side of the fabric facing down) then the batting. Secure with straight pins. I always use red straight pins at the beginning and end of my stitching to remind me to stop and leave an opening.

STEP 4: STITCH AROUND
Stitch around the mask with a 1/4-inch seam allowance. Leave the three-inch gap at the top that is marked on the pattern open. Make sure to backstitch at the beginning and end to secure.

STEP 5: TURN AND PRESS
Turn the sleep mask to the right side and turn in the edges of the top opening.

Give it a press with the steam setting on the iron.

STEP 6: SECURE OPENING
I am an impatient crafter, so I secure openings like this one with Fabri-Tac Glue by Beacon Adhesives. It grabs quickly and is pliable when dry, so it will have some give. Topstitching the opening closed with a needle and thread is also an option.

STEP SEVEN: EMBELLISHMENT
Fussy cut eyelash pattern. For small, detailed embellishments I like to apply a removable adhesive runner to the back of the paper pattern and then secure it to the felt.

This makes cutting out the detailed eyelash pattern easy and accurate. Repeat with the second eyelash.

Attach eyelash embellishments to the front of the Simple DIY Sleep Mask with Fabri-Tac Glue, and let dry.

If you don’t have all the supplies listed above, here are some good substitutions. For the fabric recycle a flannel shirt, a favorite t-shirt, or even a pillowcase or bed sheet. In the place of a sewing machine, hand-stitching or fabric glue would work well if you cut the fabric with pinking shears so it doesn’t fray. For the ties use ribbon, stretch lace, or recycle an elastic headband.

Sew a Mask for Sleeping in just 30 minutes

Quick and Easy DIY Sleep Mask with Free Patterns
The Poly-Fil® Project Fleece Batting by Fairfield World™ creates a soft but sturdy sleep mask that keeps out the light. Are you all ready for an afternoon nap now? I know I am, so lock the bedroom door and get in a quick 10- or 15-minute power nap. Now, that might be wishful thinking but if you are lucky enough, put on your new simple DIY sleep mask and snooze away.

MORE HANDMADE IDEAS FOR A SLEEPOVER PARTY:
Morena from Morena’s Corner shares how to make a cloud lantern to set a sleepy mood.
Lindsay from Artsy Fartsy Mama has an easy tutorial to sew a pocket pillow with an insert from Fairfield World.
Laura from Me and My Inklings is sharing an awesome Popcorn Toss Bean Bag Game using Poly-Pellets in a pourable pouch.
Sharing is Caring! If you LOVE it, Please PIN it!
Too busy to make this DIY Sleep Mask with FREE Patterns right now? Pin it for later! I'd love for you to pin this project to your favorite craft board on Pinterest and then it’ll be waiting for you when you’re ready.


Sweet Dreams and Thanks for stopping by!

