
Tombow and Avery Elle Blog Hop
To follow along in the blog hop, I hope you have arrived here from the talented Caryn Davies blog, but if you have stumbled across my blog, please make sure you start the hop party directly at the Avery Elle
Blog
Blog
Now on to my project!

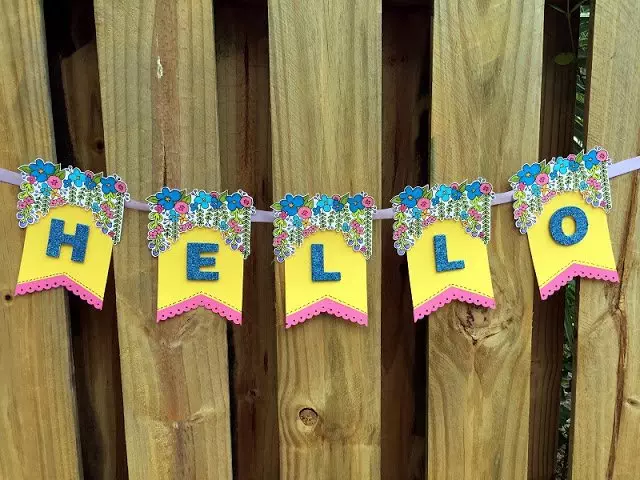
I LOVE the Canopy Clear Stamp Set from Avery Elle for coloring with my Tombow Dual Brush Pens, so This was definitely a FUN project for me to complete – plus who doesn't LOVE glitter!
STEP ONE:
For me, the first step is ALWAYS a color scheme. I placed the flower section of the Canopy Clear Stamp Set onto an acrylic block and stamped it about 8-10 times with black archival ink. A brand new stamp normally takes 2-3 impressions before the image becomes crisp and clear. Then I started selecting colors of Tombow Dual Brush Pens. Once I was pleased with my selection of colors, I wrote in the number on the color swatch. This allows me to stay organized.

STEP TWO:
Then we are on to coloring in the images. I needed five of the canopy of flowers, so I colored while watching a movie with my niece and nephew. Coloring is very relaxing!!

STEP THREE:
I roughly cut out the five canopy of flowers, selected some bright yellow and bright pink coordinating cardstock and then got busy glittering some chipboard letters! Tombow MONO Multi Liquid Glue is excellent for glittering chipboard letters and this Lapis Glitter matches the Tombow Dual Brush Pen #452 perfectly! My tip is to color the edges of your chipboard with the matching color of Dual Brush Pen, so the color is uniform.

STEP FOUR:
Measure and cut five rectangles 4 1/4″ wide by 5 1/2″ long from bright yellow cardstock. Measure up 1″ from the bottom and to the center, then connect the center dot to each of the bottom edges to create a triangle. Cut triangles out with scissors, add Tombow Foam Tape to the top edge and attach canopy of flowers for dimension. Attach glittered chipboard letters to banner with Tombow Foam Tape, then draw a dotted line to highlight the bottom edge with Tombow Dual Brush Pen #N15. Cut 1″ strips of bright pink cardstock, then punch with decorative edge punch. Attach to bottom of banner with Tombow Xtreme Permanent Adhesive. Trim excess cardstock flush with side of banner.

STEP FIVE:
Attach each banner to 60″ length of lavender satin ribbon, leaving 12″ at either end and 2″ in between banners with Tombow Xtreme Permanent Adhesive.

Here is a close up detail of the “H” section of the HELLO banner! It's bright and sunny and I am going to hang it on my mantel to welcome family and friends.

NOW ON TO THE FUN STUFF – PRIZES!
Comment on each the Designers’ projects as you hop through their blogs for your chance to win a prize you are
guaranteed to fall in love with! One lucky winner will get BOTH a $50 Gift Certificate from Avery Elle and $50 worth of Tombow Adhesives!
guaranteed to fall in love with! One lucky winner will get BOTH a $50 Gift Certificate from Avery Elle and $50 worth of Tombow Adhesives!
Use the Rafflecopter below to get up to 43 chances to win!
document.write(”);
Make sure to check out and follow Tombow USA and Avery Elle on Instagram for TONS more inspiration daily!
Thanks for stopping by! -Beth

All the cute flowers and branches dangling over the banner looks amazing.
Wow! What cool banner! Very clever and beautiful.
Wow- what a lovely banner!
What an adorable banner
Gorgeous banner, Beth! Love it!
Thanks for sharing!
Great banner.so nice stamps AND colors of PEN
I love the design of the flowers.
They will be the topping for many of
my greeting cards.
They really make the banner pop.
thanks for sharing.
That is a unique look using that flower stamp at the top of each letter of the banner.
And such bright, fun colors from the Tombow pens.
What a fun, bright way to welcome family and friends! It made me feel happy even seeing it through a computer screen!
i just adore that cascade of flowers!
Interesting to see that same flower stamp done with bright colors. Lovely used in a banner too.
Wonderful project — your banner is so bright and cheerful!!
WOW…. Beth… this banner is WOW!!! Thank you so much for the inspiration. Glad to find your blog 🙂
Gorgeous banner! Love your pretty flowers and all the glitter.
Very cute banner.
What cool project! Love the cascade of colorful flowers above each letter. Very nice!!
What a happy, fun banner! And a great way to use the canopy stamp.
Beautiful banner! I love the sparkle!
Very festive and pretty banner, love it.
This is adorable and I love the color scheme! Thanks for the great how-to steps and pictures 🙂
So pretty and inviting!
Oh Beth, this is so sweet! I need to show this to my daughter as she has banners around her house all year round, she's going to love this! TFS!
What a great looking
banner! I love this
canopy of flowers.
Very pretty.
Carla from Utah
I have this stamp and love your coloring. The banner is amazing. Thanks for sharing your great idea.
Fantastic banner!!
Such a bright cheerful creation!!
Love this project. Beautiful banner.
Wow. Cute banner
Very cute banner! Love the waterfall flowers and scallop border!
Awesome banner! Love the stamp set you chose and your pretty coloring!
Very cute. I like the sparkle. This stamp is perfect for a banner.
Great Project!
Bet it was fun coloring all those flowers!
Thanks for Step by Step!
How sweet. I love banners and what a great and new way to use your stamp. Pretty colors and your coloring is super. Fantastic!
Beautiful. Great idea. TY for sharing
I love your glittery letters!! Your banner is beautiful! Thanks for sharing your ideas with us!
What a great way to spruce up a banner!
Such a lovely banner!
Love your banner!
Great banner, nice bright colors and sparkle. Thanks for sharing.
I love this banner. Thanks for the inspiration.
Your Canopy Flower banner is incredibly pretty; love your colours!
~carol
Your Canopy Flower banner is incredibly pretty; love your colours!
~carol
So bright and cheerful…wonderful way to welcome guests.
What a great idea to have the canopy flowers drape over the top of your banners! So colorful & fun!
What a great idea to have the canopy flowers drape over the top of your banners! So colorful & fun!
Clear stamps and glitter are like my new love language! So beautiful!!!
HELLO AWESOME!!!
WOW – what a FABULOUS banner, LOVE the floral framing for each sparkling letter!!!
THANK YOU for sharing, I'm INSPIRED, looking forward to making some too 🙂
What a fun banner! Love how you colored the flowers!
Oh my goodness, Beth!! What a beautiful banner this is!!! I absolutely love how you colored and used the flowers!! SO fabulous and SO inspiring!!! Thank you!!!
Oh wow! Your project is really cute and lovely!!!!